Video
Introduction
CS:DM allows you to generate videos, images, and/or audio from demos.
This feature is accessible by clicking on the Video tab from a match.
Video jobs are added to a queue, allowing you to schedule multiple videos…
How does it work?
CS:DM starts Counter-Strike, plays the demo and executes a game command that generates many uncompressed image files (.tga) and an uncompressed audio file (.wav) hereafter referred to as raw files.
Once the recording ends and Counter-Strike is closed, the application uses FFmpeg or
VirtualDub to generate the video(s) from the raw files.
Raw files are not needed when using HLAE with FFmpeg and the output is video.
This configuration allows you to save disk space and time.
Compatibility
| OS | CSGO | CS2 | Death notice edition (HLAE) | Encoding software |
|---|---|---|---|---|
| Windows | ✅ | ✅ | ✅ | FFmpeg/VirtualDub |
| Linux | ✅ | ✅ | ❌ | FFmpeg |
| macOS | ✅ | - | ❌ | FFmpeg |
Terminology
Tick
Ticks are a unit of time the game uses; you can think of it as seconds.
For CS2, 1 second corresponds to 64 ticks. For CS:GO, it depends on the server's tick rate (usually 64 or 128).
Because seconds are more accessible for humans, the application allows you to edit the duration in seconds and converts it automatically to ticks.
Sequence
A sequence is a part of the demo you want to record, defined by a start tick and an end tick.
You need to add one or more sequences, which you can merge into a single video or generate one video per sequence.
Video ID
Each video has a unique ID generated by the application and used to create a unique folder where the raw files and/or
the video(s) will be saved.
These unique IDs prevent overwriting files when generating multiple videos.
Interfaces
Video generation
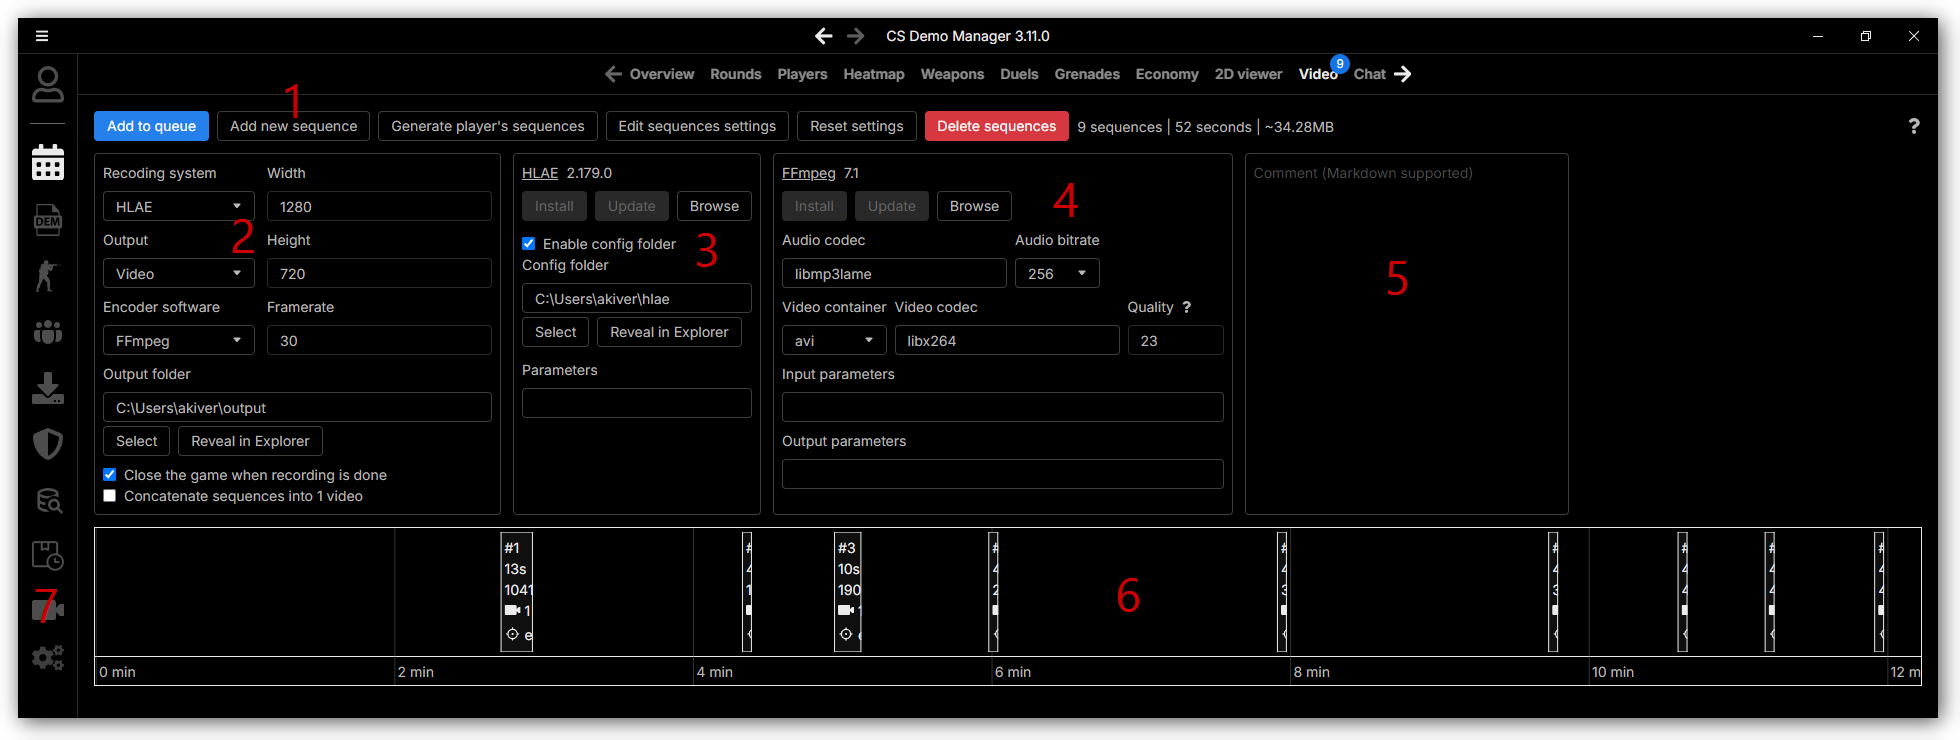
- Button to add a sequence from a dedicated window.
- Output options (resolution, encoder software, etc.).
- HLAE options (Windows only).
- Encoder software options (FFmpeg/VirtualDub).
- Match's comment.
- Sequences timeline.
- Video queue.
Sequence edition
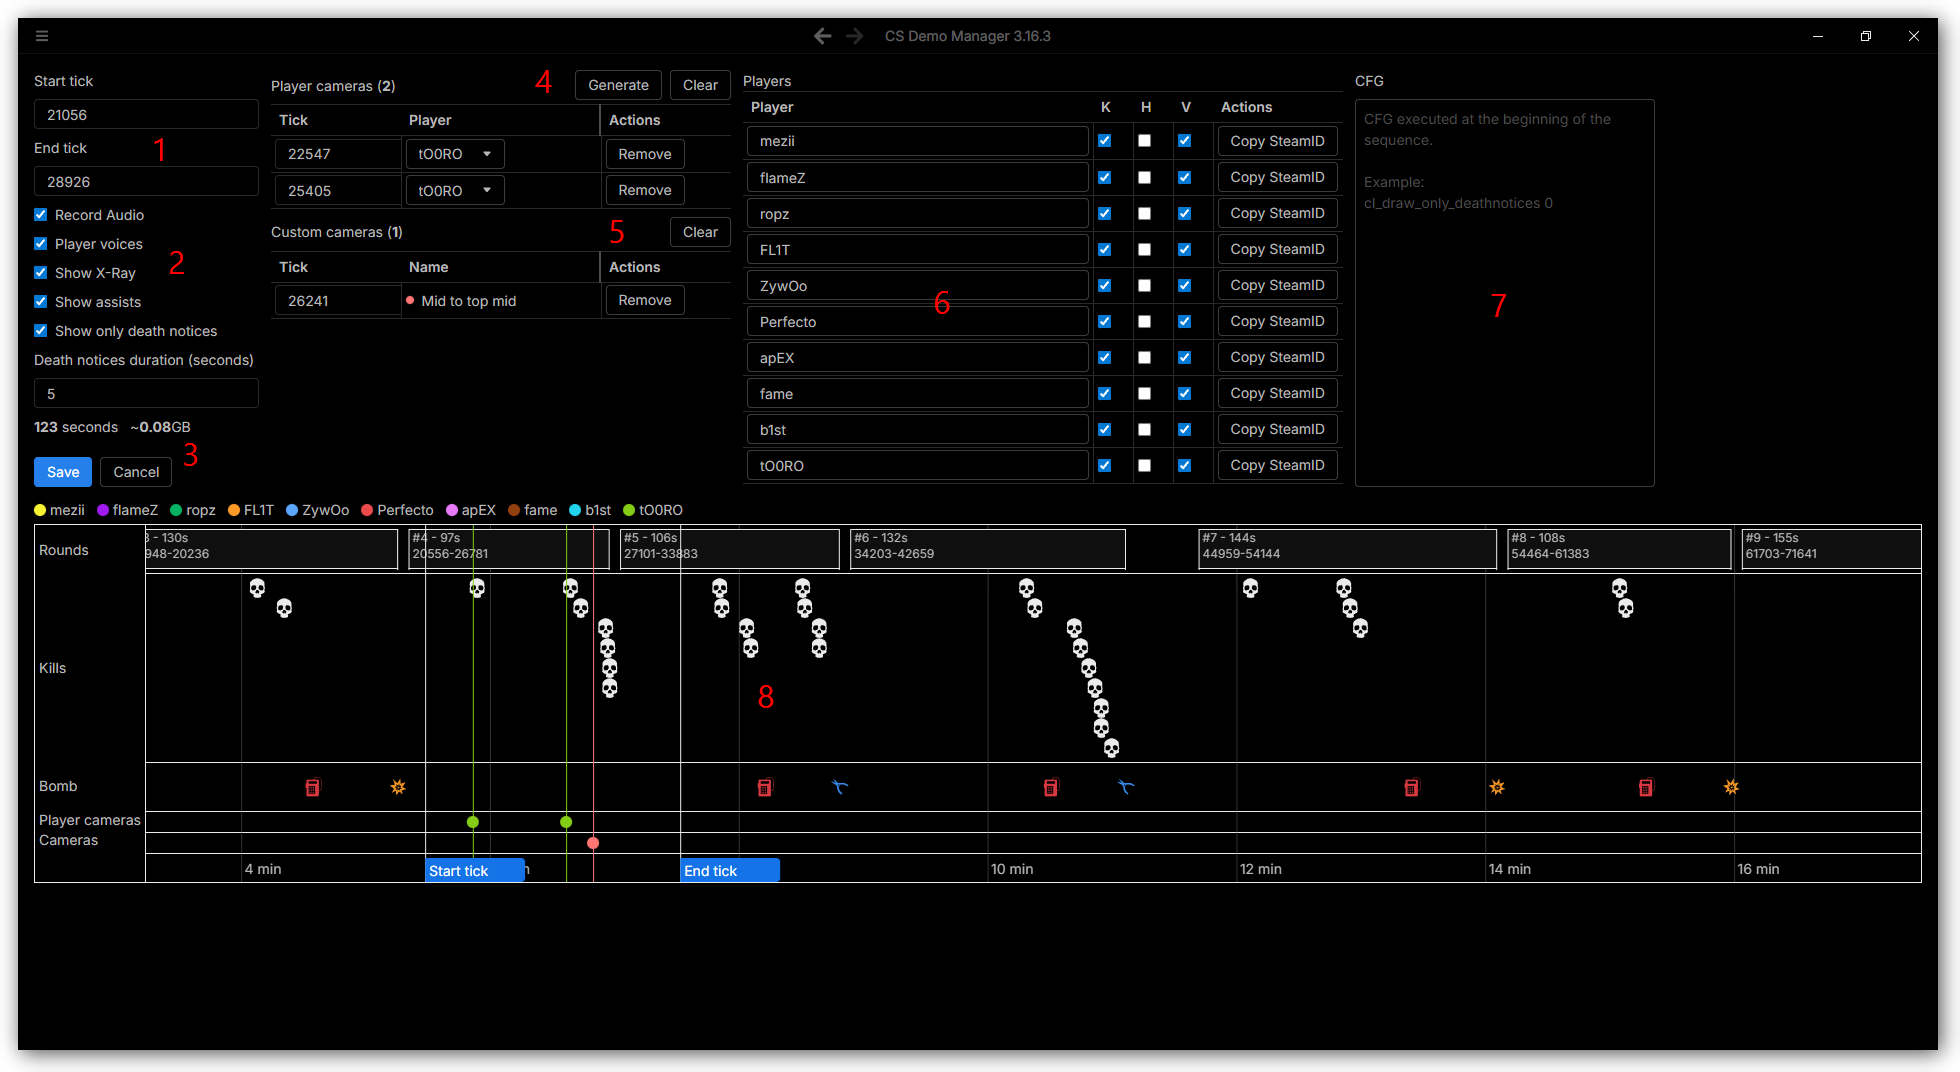
- The inputs to set the sequence start/end ticks. You would probably not type the ticks manually but use the rounds timeline below.
- In-game options.
- The sequence's duration, how much disk space it requires and a button to add it.
- List of camera focus events on players during the sequence.
- List of fixed viewpoint cameras during the sequence.
- Players options.
- Game commands executed when the sequence starts.
- Rounds timeline.
Each player has a distinct color that is used to highlight the player's camera focus in the timeline.
Installing/updating required software
HLAE
HLAE is a Windows-only tool that adds movie-making features to Counter-Strike such as advanced camera control, visual effects, HUD alteration…
CS:DM uses HLAE mainly to:
- Avoid the need to generate temporary raw files that take up disk space.
- Define where raw files will be saved (the
startmoviecommand doesn't allow you to choose the output folder). - Customize the death notices.
To install or update HLAE, click on the corresponding button from the HLAE options.

Updating HLAE is strongly recommended as game updates may break HLAE compatibility!
Please note that HLAE compatibility updates may take some time to be released after a breaking game update.
Custom location
You can use a custom HLAE build by going to Settings -> Video.
From the HLAE section, click on Enable custom location and select the path to the HLAE.exe file.
FFmpeg
FFmpeg is a free and open-source software used to generate the video(s) from the raw files.
To install or update FFmpeg, click on the corresponding button from the FFmpeg options.

Custom location
You can use a custom FFmpeg build by going to Settings -> Video.
From the FFmpeg section, click on Enable custom location and select the path to the ffmpeg.exe file.
When using a custom FFmpeg build, the auto-update feature is disabled - you will have to update it manually.
VirtualDub
VirtualDub is a Windows-only software used to generate uncompressed video(s) from the raw files.
In the context of CS:DM, it aims to assist moviemakers who want to edit the video(s) with video editing software such as Adobe Premiere, Sony Vegas, etc.
To install VirtualDub, click on the corresponding button from the VirtualDub options.

Output options
Recording system
Recording system refers to the software and its commands that will be used to generate the video.
There are 2 options:
- Counter-Strike: through its
startmoviecommand that generates raw files. - HLAE: through its
mirv_streamscommands that internally use the CSstartmoviecommand but enhance it.
If your goal is to generate a video and you are on Windows, the best option is to use HLAE + FFmpeg as it doesn't need to generate raw files and is faster.
Output
- Video: generate a video file - you can change the container format (
.mp4,.avi…) from the FFmpeg options. When using VirtualDub, the format is always.avi. - Images: generate images (
.tga) and audio (.wav) files.
This option is useful if you want to edit the video with video editing software and need to have the raw files. - Images and video: combine the above options - generate images and audio files and then generate the video from them.
Encoder software
Set the encoder software that will be used to generate the video(s).
You can choose between FFmpeg and VirtualDub (Windows only).
VirtualDub generates uncompressed videos. It's recommended only for editing the video with video editing software.
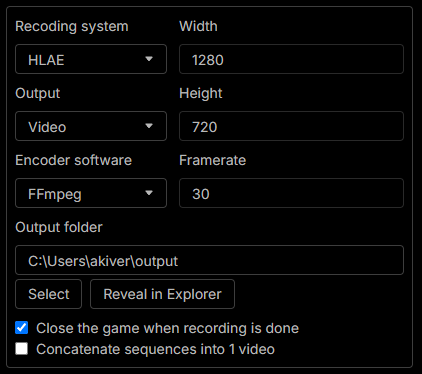
Width
Set the video width.
Height
Set the video height.
Frame rate
Set the video frame rate.
Output folder
Set the folder where the output will be saved.
The files will be located in a subfolder that has the video ID as the name.
The default location is the folder where the demo is located. If you change it, the application will remember and use it for the next recordings.
Because the startmovie command creates raw files in the game installation folder, ensure you have enough space on the disk where the game is installed.
The app warns you if the required disk space is above 40GB.
The only case where disk space is less of a concern is when using HLAE + FFmpeg and the output is a video because the video is generated directly without raw files.
Close the game when recording is done
When enabled, the application automatically closes the game after recording completes.
Show only death notices
If enabled, only death notices will be shown in-game.
Concatenate sequences
If enabled, all sequences will be merged into a single video.
HLAE options
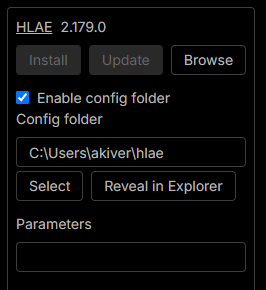
Config folder
From the HLAE documentation:
(Optional, but recommended) This creates a fresh config folder for your custom config(s) and video settings. If the folder doesn't already exist, HLAE will create it for you when you launch the game. After the folder (and files) have been created, you can add your custom config(s) in the cfg folder (the same place as the config.cfg).
Note: If you don't use this feature, HLAE will use the same settings as your regular gaming config and video settings, and if you make any config, command, or graphics changes, those may carry over to your gaming config, and vice versa.
Parameters
Additional parameters that will be passed to HLAE.
See the HLAE documentation for more information.
FFmpeg options
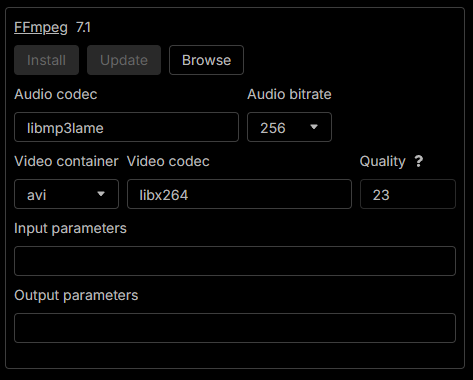
Audio codec
Set the audio codec corresponding to the -acodec FFmpeg option.
The default codec is libmp3lame.
For detailed information, refer to the FFmpeg documentation.
Audio bitrate
Set the audio bitrate corresponding to the -b:a FFmpeg option.
Video container
Set the video container format, it's the file extension passed to FFmpeg.
Video codec
Set the video codec corresponding to the -vcodec FFmpeg option.
The default codec is libx264.
For detailed information, refer to the FFmpeg documentation.
Quality
Set the video quality for the selected video codec corresponding to the -crf FFmpeg option.
A lower value generally leads to higher quality but larger file sizes.
This option has no effect and the input is disabled if you defined a custom FFmpeg output parameters when using HLAE + FFmpeg.
The reason is that it allows you to have more control over the parameters passed to FFmpeg through the HLAE recording preset (this is for advanced usage).
The only parameter that is always passed to FFmpeg is the video codec (-c:v parameter) which is set to the value in the video codec option.
In such case and if you want to use the -crf parameter, you will have to set it in the FFmpeg output parameters.
Input parameters
Set additional FFmpeg input parameters.
It corresponds to input_file_options in the FFmpeg command line synopsis.
Output parameters
Set additional FFmpeg output parameters.
It corresponds to output_file_options in the FFmpeg command line synopsis.
When using HLAE + FFmpeg and the output is video, these parameters will be passed to FFmpeg through the HLAE recording preset.
The application generates the following recording preset:
mirv_streams settings add ffmpeg customPreset "OUTPUT_PARAMETERS_HERE" video.avi
Adding a sequence
To add a sequence, click on the Add new sequence button from the Video tab.
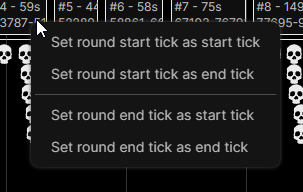
Start/end ticks
To define the start/end tick of the sequence, you have 2 options:
- Type the ticks manually in the inputs.
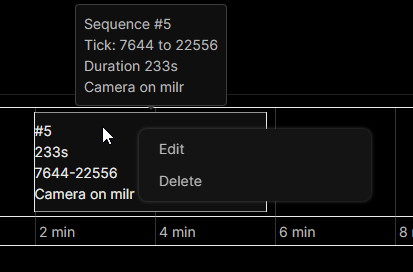
- Use the timeline's context menu.
Using the timeline context-menu is easier to use.
For example, if you right-click on a round, you will be able to change the ticks quickly:
Cameras
You can mix player-focused POVs with fixed map viewpoints.

Player focus
You can ask to focus the camera on a specific player at any tick during the sequence.
To do so, you have 2 options:
- Right-click on an event from the timeline, go to Focus camera and select the player.
- Click on the Generate cameras button to open the following dialog:
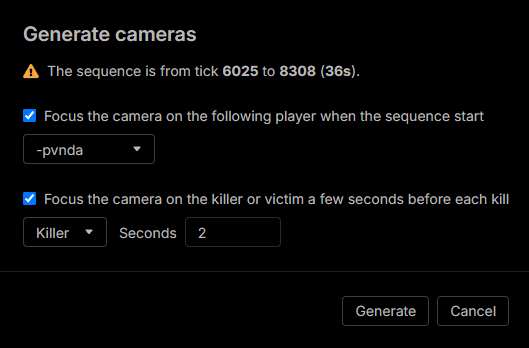
This dialog allows you to focus the camera on a player at the start of the sequence and generate cameras focus from events that happened during the sequence with a delay.
Fixed viewpoint
You can also use fixed viewpoint cameras defined in the application cameras settings.
To do so, right-click on the timeline, go to Set camera and select the camera you want to use.
If you don't see Set camera in the context menu, it means there is no camera defined for the current map and game and you need to add one first!
In-game options

Record audio
Enable/disable audio recording.
Player voices
Fully enable/disable player voices.
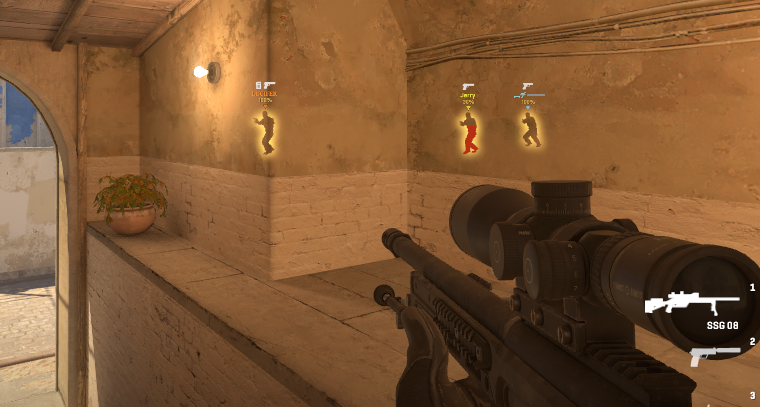
Show X-Ray
It turns on/off the Counter-Strike X-Ray mode.
When enabled, you can see all players through walls:
Show assists
It turns on/off the display of assists in death notices using the mp_display_kill_assists game command.
Show only death notices
It turns on/off the death notices using the cl_draw_only_deathnotices game command.
Players options
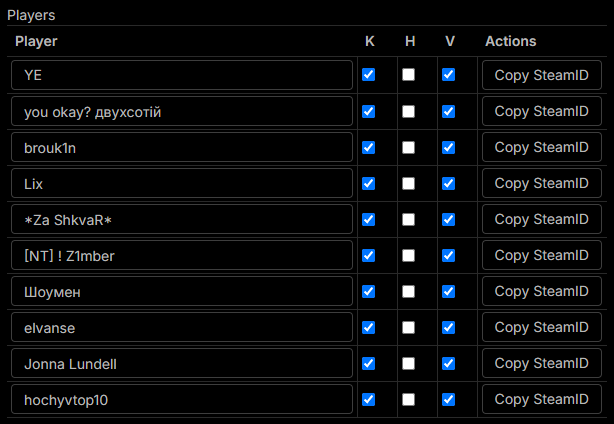
For each player, you can:
- Change the player's name
- Hide/show the player's kills
- Force highlight the player's kills (the notices will have red borders in-game)
- Enable/disable the player's voice (CS2 only)
CFG
Game commands that will be executed when the sequence starts.
Each command must be on a new line.
You can also put HLAE commands (mirv_) here on Windows.
Starting the generation
Always check how much disk space is required before starting the recording, and ensure your disk has enough space!

Once you have added at least one sequence, click on the Add to queue button to add the video to the queue.
You will be redirected to the video queue:
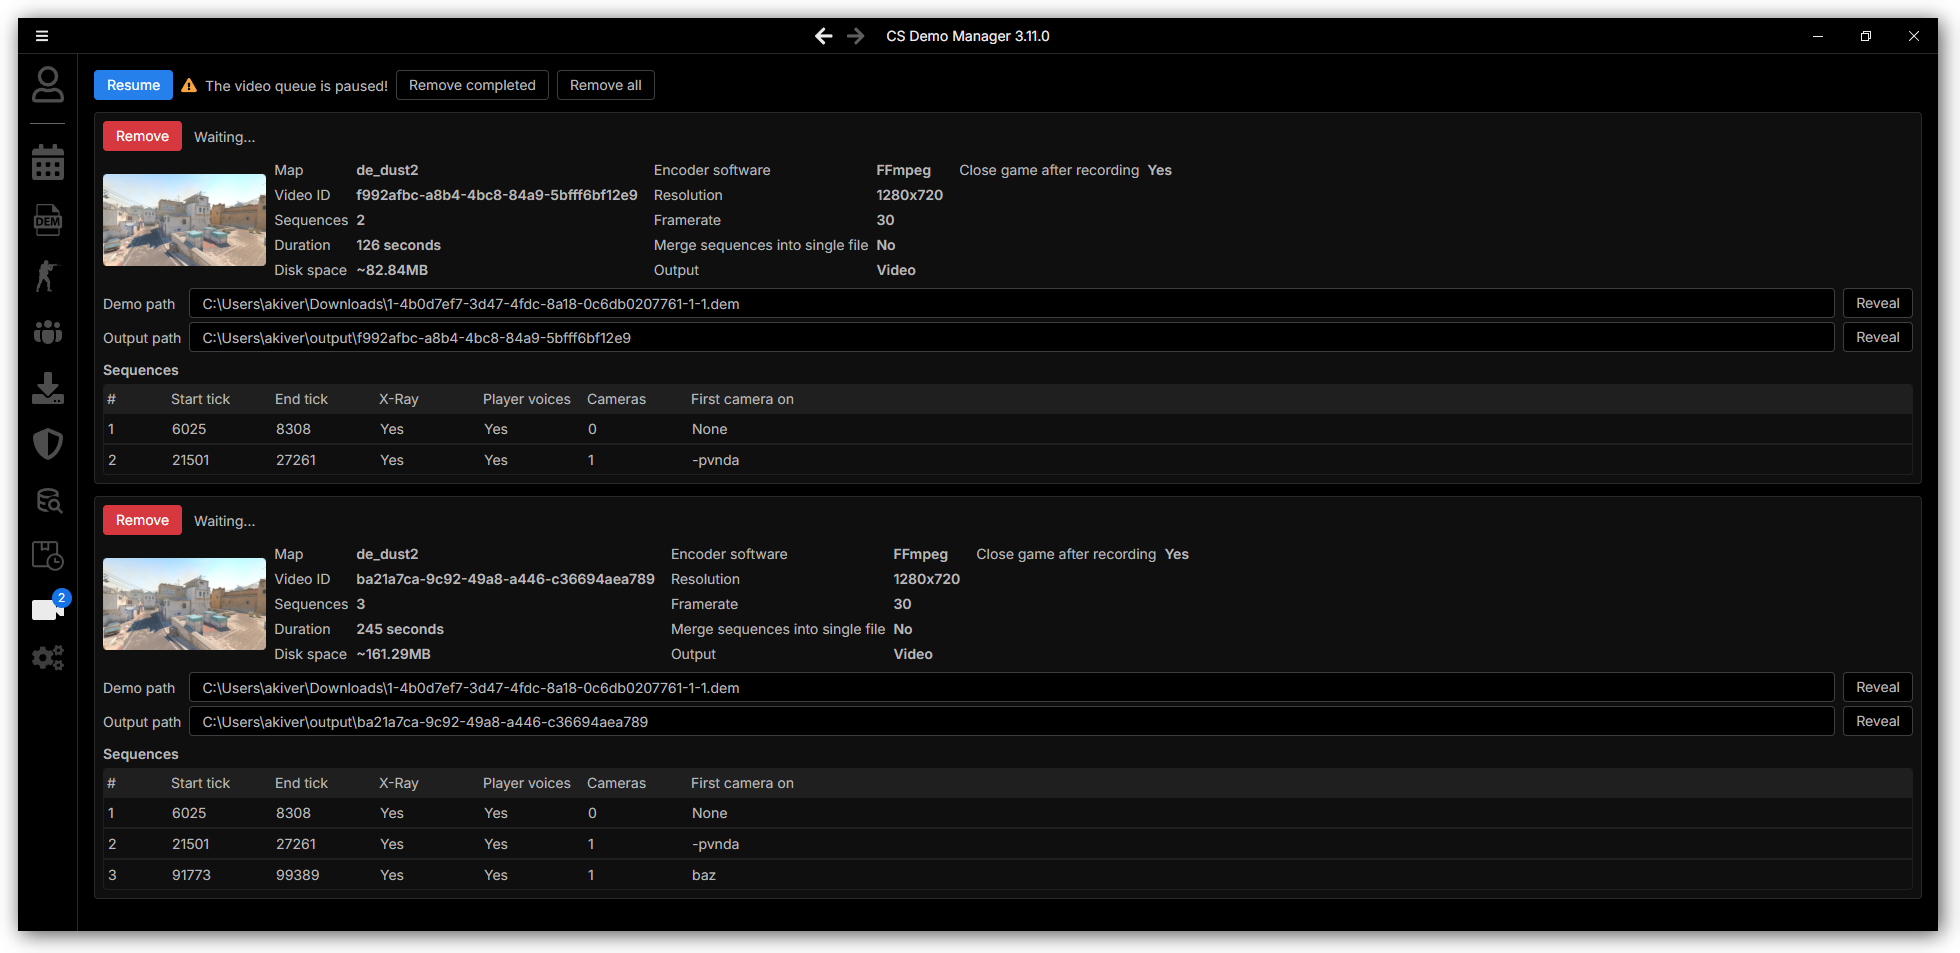
By default the queue is paused, click the Resume button to start the generation.
You can also pause/resume the queue, cancel the generation, and remove one or all videos from the queue.
Editing a sequence
To edit a sequence, double-click on it from the sequences timeline or right-click on it and click Edit.
You can also delete it by clicking Delete.
Tips
Timelines
The application shows timelines to help you add sequences based on round events and visualize the final sequences.
Timelines are interactive. You can click and drag to move on the timeline, use the mouse wheel to zoom in/out, and
right-click to open a context menu.
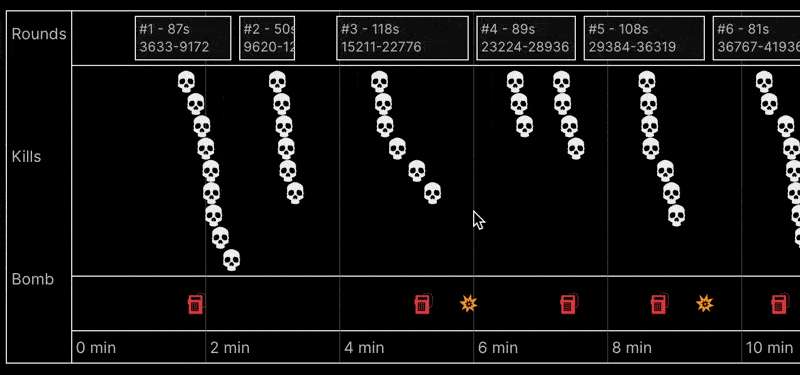
Round comments
If you add a comment to a round in the match Rounds tab, the timeline displays a comment icon. Hover the icon to read the comment.

Generating player's sequences
To generate sequences for a specific player and a specific event (kills, rounds…), you have 2 options:
-
From a match's scoreboard context menu, go to Generate video and click on the type of event you want to generate sequences from (kills, rounds…).
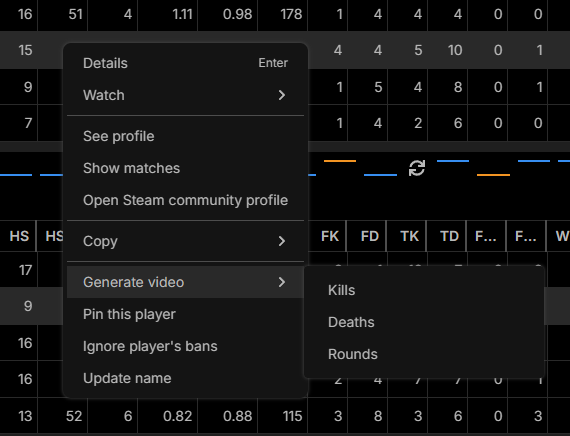
-
Click on the Generate player's sequences button from the Video tab.
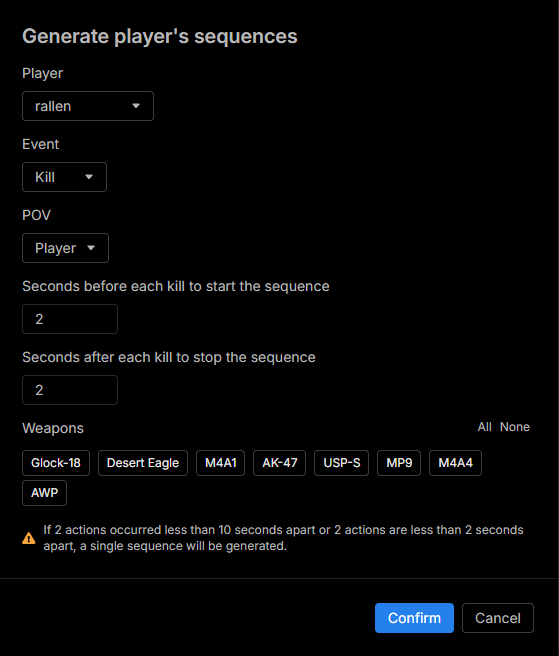
The dialog (option 2) gives you more control such as camera POV, start/stop delay, and weapon filter.
FAQ
I have an error when the game starts
Make sure to update HLAE - game updates may break HLAE compatibility.
I can't play the video
If you have a black screen or the video playback doesn't start when opening it in your video player, it's probably because your video player doesn't have the required audio/video codecs.
This can happen especially on Windows when using Windows Media Player.
The solution is to use a video player such as VLC that includes required codecs.